
LET’S GET READY TO BUNDLE
Like many accountants, our client list includes businesses across numerous industries and only seem to have one thing in common, they do not like change, especially to their accounting system. Sometimes it can be the smallest feature that provides the user the greatest value, a lesson we quickly learned when we discovered Markups were unavailable on estimates online.
Markups (the amount added to the cost price of goods to cover overhead and profit.) have been a part of QuickBooks Desktop and QuickBooks Online for years, but their online functionality was limited to invoices with billable items and expenses. It wasn’t until we converted an interior design company that the true complexity the markup column played in her ability to confidently bid on a project, and win. With a new appreciation for the level of importance, we spent hours searching for a workaround for the missing column until we started to dig into two-sided inventory items and purchase orders and finally with Intuit’s new bundle feature.
It turns out that Bundles were just the magic we were looking for. Depending on how we structured the bundled items, we discovered we could control the information being present to the client. After spending a little time with our client, the interior designer, we created a couple inventory & markup bundles on an estimate template reducing the amount of time spent generating new estimates.
As they say, good accounting is a work of art, and while my perspective may be a little different on how to use bundle items, we thought we should share the idea with our fellow artists as a solution to using markups on estimates
Bundles bring a new level of control to Estimates in QuickBooks Online, that was previously unavailable: Hidden Markups. This Guide will demonstrate how Bundles can be utilized in QuickBooks Online to enable markups on estimates. We will display how they appear on an estimate to the client as well as how it would be entered in QuickBooks Online.

- Selecting the Gear Icon
- Click on Product and Services
Things to Consider:
- What are you going to combine and why?
- Do you want the individual parts displayed or hidden?
- Dont forget to think of a Name
Few Notes About Bundle items:
- There is a limit of 50 component items in a bundle.
- You cannot bundle another bundle.
- You can rearrange the order of component items in the list by dragging the icon found at the left of the item.
- While you cannot assign bundles to a category, you can sort your inventory by type for quicker selection.
- When converting an estimate to a purchase order, the bundle will not transfer but its parts can if the purchases description and cost have been filled in.
- They can be used in: Estimates, Invoices, Sales Receipts, Credit Memos, Refund Receipts, Delayed Credits, and Delayed Charges.
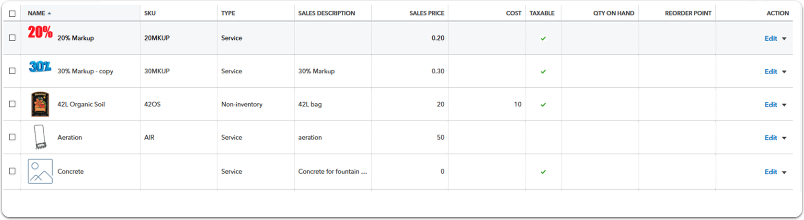
Inventory | Non-Inventory | Service | Bundle
Creating a New Inventory or Service Item 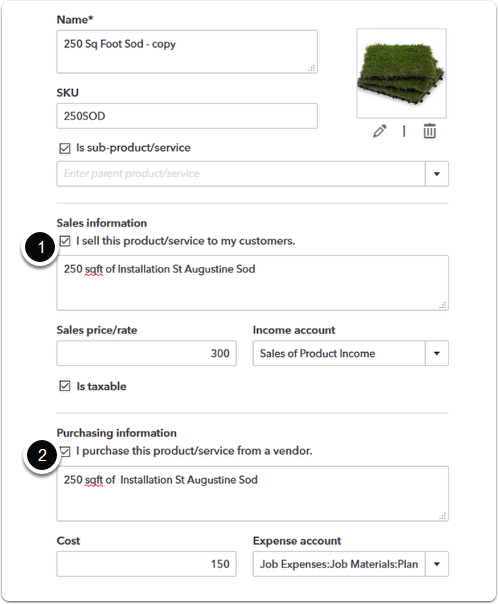
Sales Information:
- The information added will be used to calculate the the total Bundle Price.
- You will have the choice to hide the price and description in later steps
- By selecting is taxable, it is possible to tax only parts of the Bundle.
Purchasing Information:
- To transfer parts of a bundle from an estimate to a purchase order, the purchase information must be filled in.
- The description and the cost will be transfered to Purchase Orders and Billable expenses.
Creating a New Markup Items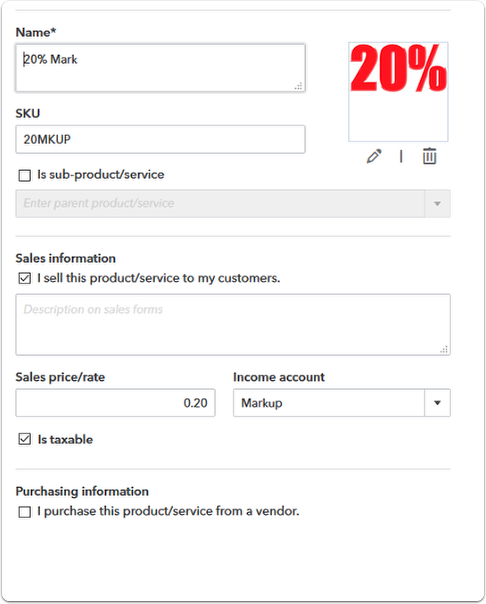
Sales Information:
When creating a Markup or Discount Item you only need to fill out the Sales information. This will ensure the item does not transfer to Purchase Orders.
Purchasing Information:
This area controls the information that will be displayed when estimates are converted into purchase orders and billable expenses. For Additional information about two-sided items, check out our Youtube Video
Putting the Parts Together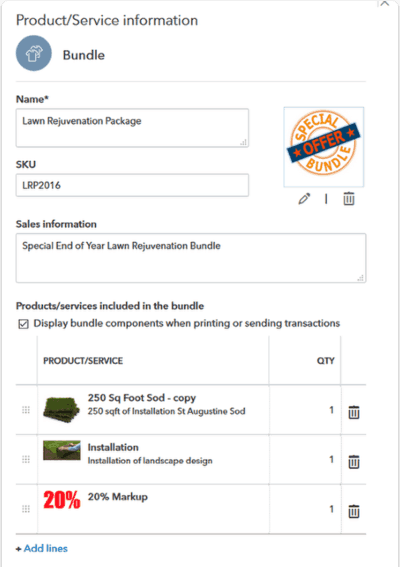
Name: Select a Name that makes it easy for you to find
SKU: SKU numbers are great for denoting its a bundle in code!
Sales Information: Information to display on Estimates & Invoices
Display Check Box:
- Select the Display Box to display all the product information
- Leave it empty to ONLY display the Bundle description and combined pricing
Pictures: Can help you quickly find inventory items if many items are close in SKU and Name.
At this time, pictures are not used on Estimates or Invoices, but hopefullly in the future they will be!
IMPORTANT PARTS OF THE BUNDLE
Parts of the Bundle
Bundle items enable QuickBooks Online users to quickly add a hidden markup per item on estimates and invoices.

- This Product/Service
- The Description with Line Breaks to allow multiple lines of text in a single cell
- The Quantity
- The Rate
- The Total

After creating your bundle and adding it to an estimate or invoice, here are a list of the different parts and how they appear on the screen and to a client on the invoice.
- The Complete Bundle Item
- The Markup item within the Bundle
- The Bundle Total
- A Bundle Component (Quantity & Rate)
- The Markup Item (Quantity & Rate)
- Taxable Check box
- Subtotal Line
- Price Adjustments to Bundles
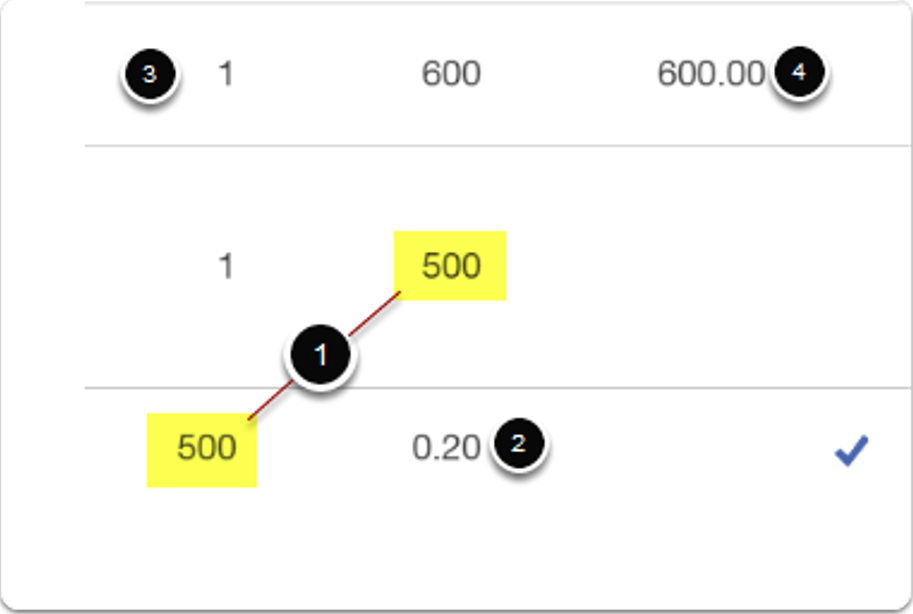
ADJUSTING PRICE THROUGH THE MARKUP ITEM
When Quantity/Rates Remain Constant But Markup May Change

The Markup Should be in the Quantity Column
In this example, imagine that you had a fixed bundle price but wanted to be able to increase or decrease the total cost by adjusting the markup. This will allow you to adjust the % of markup to match the total value of the Bundle (after the markup). In this example, our Bundle started $150.00 (1) and we wanted a 20% mark up (2) but had agreed to final price of $165.00 (4). By changing the markup from 20% to 10% (3) you were able to meet your desired price.
1. The Fixed total of the Bundle items before the Markup
2. The % of Markup to adjust
3. The values used to calculate the new Markup percentage
4. The Desired Bundle Total
When Markup Remain Constant But Quantity/Rates Change:
The Markup Should be in the Quantity Column
In this example, imagine that you had a fixed bundle price but wanted to be able to increase or decrease the total cost by adjusting the markup. This will allow you to adjust the % of markup to match the total value of the Bundle (after the markup). In this example, our Bundle started $150.00 (1) and we wanted a 20% mark up (2) but had agreed to final price of $165.00 (4). By changing the markup from 20% to 10% (3) you were able to meet your desired price.
1. The Fixed total of the Bundle items before the Markup
2. The % of Markup to adjust
3. The values used to calculate the new Markup percentage
4. The Desired Bundle Total