• Deep Dive Into QuickBooks Online Projects v2

How to Use Projects in QuickBooks Online

Projects was first introduced to QuickBooks Online in 2016 bringing the program one step closer to the functionality provided by its desktop counterpart. Since its introduction, Intuit has been working hand-in-hand with small business owners and accountants toward a job costing solution that everyone would love.
During this article we will share the best way to setup your company file to enable the new Projects feature. Remember the Project feature is only offered as part of QuickBooks Online Plus.

Before we can get started we need to adjust some of the company settings to turn on the Projects feature as well as the Progress Invoicing option.

Using Projects in QuickBooks Online
Select the Gear icon at the top right side of the screen.
Under the Your Company column, select Account and Settings

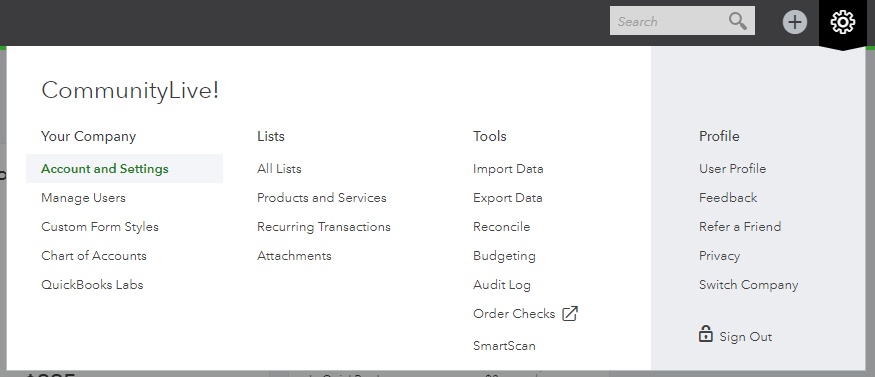
Setting up your Company File:

Expenses Tab:

  • Make expenses and items billable
  • You may also want to enter a percentage for the markup
  • Purchase orders is turned on

Sales Tab:

  • Turn on Progress Invoicing

Advanced Tab:

  • Select the pencil icon on the Projects section to turn the feature on.
  • Check the Organize all job-related activity in one place box
Select Save and Done.
Using Projects with QuickBooks Online

Creating Your New Items

Using Projects with QuickBooks Online - Documents
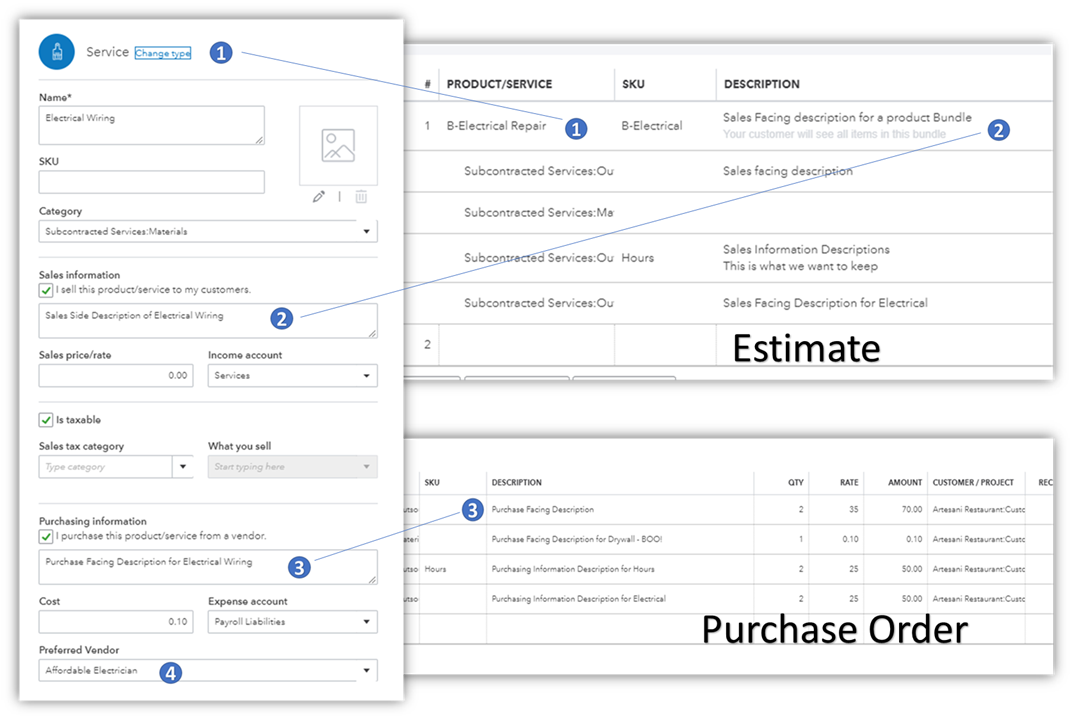
  • Create a new service item using both the sales and purchase descriptions (also known as a two-sided item). This will allow us to take the same item from the estimate and us it on an invoice as well as a purchase order which will be turned into a bill.
  • Use the sales description to display anything you want presented on the estimate & invoice.
  • Use the purchase description to display anything you want presented on the purchase order & bill.
  • Select a Preferred Vendor name to reference while ordering items using a purchase order.

Lynda’s ProAdvisor Tip:

For more on bundles where you can group items together to sell as a package, check out this blog article

“When you pay attention to detail, the big picture will take care of itself.”
-George St-Pierre

Job Costing is vital to the success of project-based businesses. Without proper tracking of expenses at the project level, you may never know how profitable, or unprofitable the job really was. At the surface level, job costing sounds very simple which often leads young businesses to dive in before they are truly ready. While some may not agree, we believe that job costing is something that a business needs to grow into.
When it comes to proper job costing, business owners should know that will require about 4x the standard time commitment to their books FOR THEM. If you stop and consider all the client communications involved with each job and each expense approved for the job, it is nearly impossible for an outside accountant to properly assign transactions between jobs without a lot of help.

Workflow of Creating a New Project:

Each project should begin by creating an estimate in QuickBooks Online. But before we can do that, let’s start by creating a new client and then a new project under that client.
Create a new Customer if one does not already exist.
Select Projects tab when the new customer record is displayed on the screen.
  1. Select New Project.
  2. Enter the Project name (see tip below for best naming conventions)
  3. Confirm the proper Customer has been selected for the project.
  4. Select Save.
Your new project card will open (see the image below)

Matthew's ProAdvisor Tip:

Do not create the project name with the customer name at the beginning. This is very important to ensure that the project is always selected when assigning line items and not the customer by accident. We recommend you give it a unique name as demonstrated in the video. For example, use “bathroom remodel”

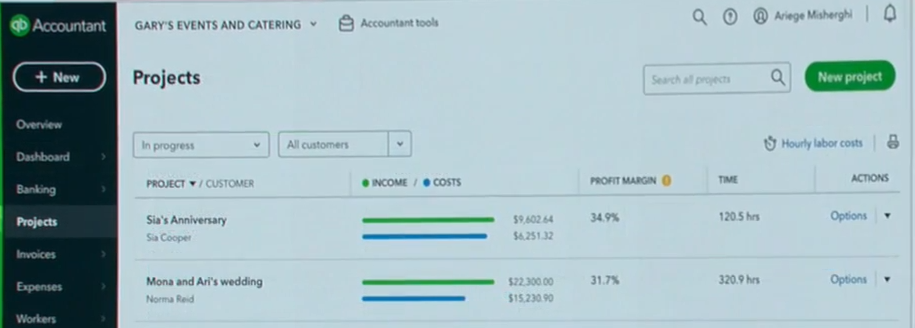
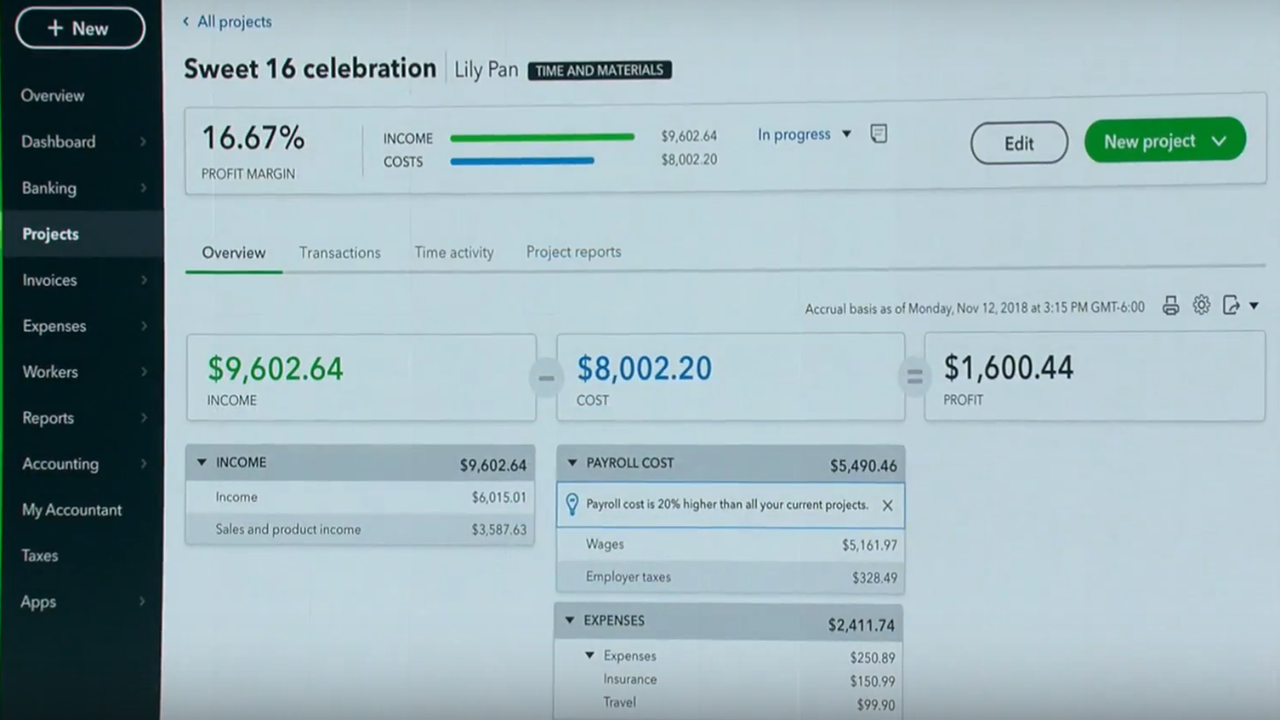
Understanding the Project Card in QuickBooks

After selecting the project that you wish to update, QuickBooks Online will display the project’s card where most of your tasks will be started.

Using Projects in QuickBooks Online - Project Card

Project Profitability:

View this section to pull up a Profit and Loss report specific to this project. Anything that you tagged to this project will be included. Don’t forget to check if your reports are displayed under cash or accrual basis.

Non-Billable Time:

This will display any time activities that you incurred toward a project but were not able to bill the customer for. This information can be useful to determine your effective labor rate for the job.

Unbilled Time and Expenses:

This is one of the most important reports to check, this will help ensure you do not forget to bill a client for unexpected expenses or additional time spent toward completion.

Transactions Tab:

Select the transactions tab to view all your estimates, invoices, billable expenses, and bills related to this project. It is important to note that expenses that were tagged to the project will not show up in the transaction list, but they do populate on the reporting.

Add to Project Drop-down:

Use this drop down to select the type of transaction that you want to add to the project. If you start each project with an estimate, you will have the ability to create an audit trail that links the money in and money out for the project.

Lynda’s ProAdvisor Tip:

Track your Estimates and keep track of them. Was the Estimate pending, rejected, accepted or closed? It will help you track your closing ratio.

The Two Paths of Project Profitability:

To simplify the workflow, there are two types of transactions that are applicable to job costing: Money In and Money Out.

Using Projects in QuickBooks Online - Two Paths

MONEY IN LOOP:

  1. Create an Estimate. Make the estimate to the project name
  2. Turn an Estimate into an Invoice with Progress Billing
  3. Receive a Payment on the Invoice
  4. Review the Profit and Loss
  5. Turn Time Activity into an Invoice
  6. Turn the Billable Expense into an Invoice
  7. Receive a Payment on the Invoice
  8. Review the Profit and Loss

MONEY OUT LOOP:

  1. Create an Estimate
  2. Turn Estimate into a Purchase Order
  3. Receive a partial Purchase Order and create a Bill
  4. Make a Bill Payment
  5. Review the Profit and Loss
  6. Add in Time Activity
  7. Create a Billable Expense
  8. Make a Bill Payment
  9. Review the Profit and Loss
Using Proects in QuickBooks Online Cash Vs Accrual

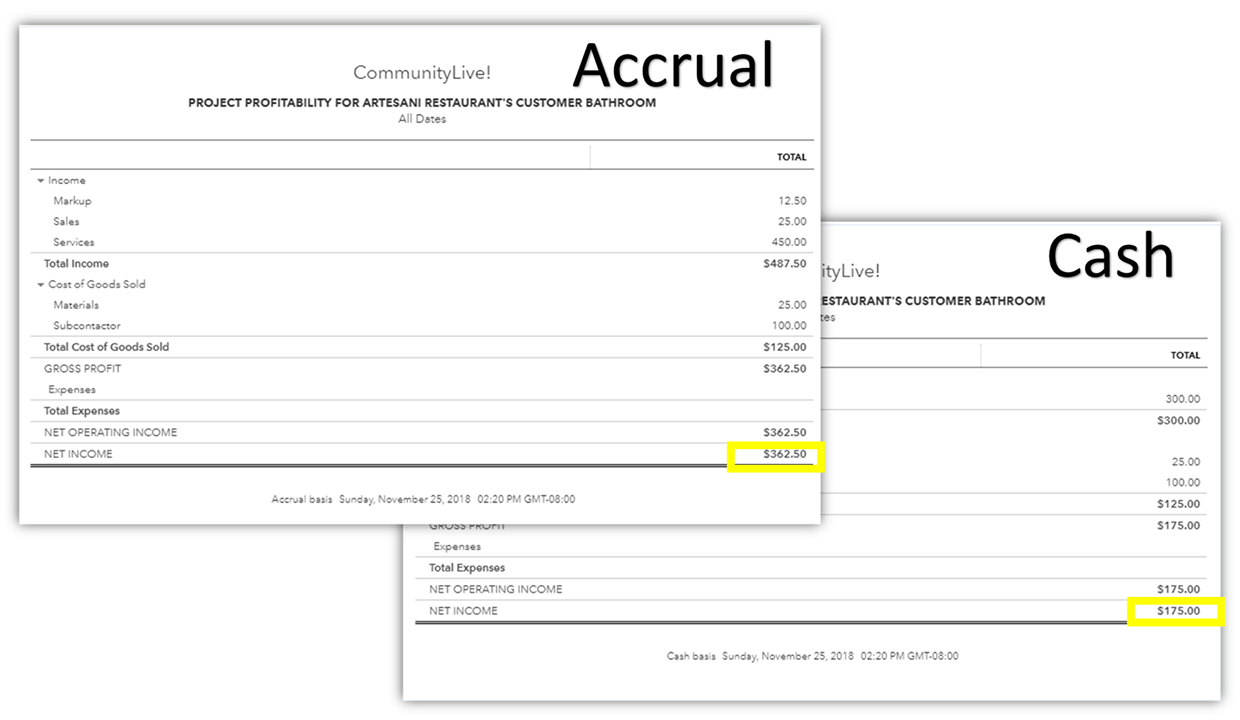
As discussed in the video, reports may look different based on your chosen accounting method. Accrual basis will show the transactions at the bill and invoice level. Cash basis reporting will show on the reports with the bill payment and invoice payment level.

New Features Coming to Projects in 2019:

Using Projects in QuickBooks Online New Features
This year QuickBooks Connect new feature announcements were heavily centered around the advancements in QuickBooks Projects. The new dashboard design makes it very easy for business owners to evaluate the performance of all their current projects at the same time. With a quick glance this new dashboard beautifully displays the total income and expenses per job as well as the total time allocated to the job and the expected profit margin.
For even greater detail, the business owner can drill into a project further and find a complete profitability dashboard.
Using Projects in QuickBooks Online New Features 2
Thanks to their acquisition of T-Sheets at the end of 2017, companies utilizing QuickBooks Payroll with QuickBooks Online will be able to utilize time tracking directly from the mobile application. Employees will be able to select a project while clocking in allowing the company to track their labor efficiency against other projects running.
Since it’s release, QuickBooks Online has been shunned by desktop users for its poor job costing capabilities. Thanks to these new improvements, I think even the most avid desktop fan cannot help but take a second look. QuickBooks Online may still have a ways to go before it could truly replace the power behind QuickBooks Desktop, but their cloud based counterpart has proven that it is here to stay.

Join to newsletter.

Subscribe to be notified of new content.

Do you have a question we can help you with?

Call us today at (805) 419-9197

We look forward to connecting soon.