
Utilizing Zoom in Social Media
Getting Started: Check your version of Zoom Meetings
To appreciate all of the features of Zoom, it is important to first update your copy of Zoom. If your Zoom looks like the image on the left, you will need to update your application to 4.3.4(46499.0224) or above.
How to update your Zoom App:
- From the device you wish to update, click on your profile picture
- Locate the Check for Updates option on the dropdown menu
- Follow the onscreen instructions to complete the update
- Repeat the same process on all devices that you use Zoom including mobile devices.
Whats New With Zoom Meetings:
Zoom provided a major update to its application on January 20, 2019. Here is a summary of the major improvements provided as part of that update:
Meetings & Webinars:
- Ability to Stop a Participant’s Share: The host can now stop a participant’s screen share by going to the Participant List and selecting More next to the sharing participant’s name.
- Indicator that a Participant is Annotating: The host can now identify which participants are annotating by viewing the participants list. The participants who are annotating will have an indicator in the color they are using to annotate.
- Support for Multiple Pages on Whiteboard: Hosts can now enable multiple pages for whiteboard. If enabled, they can create new pages, close pages, and navigate between multiple pages.
- Allow Removed Participants to Rejoin: Hosts can now allow meeting participants and webinar panelists to rejoin after they have been removed.
- Improvements to the Raise Hand Feature: The raise hand feature will now prompt users to link their audio if necessary to make it easier to speak in the meeting.
Chat Features:
- Chat Groups are now Channels: Invite an entire group of people to a meeting at once
- Personal Space for Note Taking: Take notes and save links within a Zoom chat window
- Create Favorites: Star contacts, chat channels, and Individual Messages
Support Sessions:
- Multiple Screen Support: It is now possible to select which screen someone wishes to control during support sessions
Breakout Sessions:
- Set timers for Breakout sessions: After the expired time has passed, the breakout groups will automatically be closed and users will be returned to main session.
- Force Participants into Breakout Sessions: The host can now make viewers join a group instead of waiting for them to select one.
Zoom Voice:
- A new cloud based phone system allowing businesses to combine their telephone services with the Zoom Meetings
Zoom Meeting Sessions
There are a lot of ways to customize zoom meetings to match your needs, below we will list the settings we feel deserve special attention.
In Meeting Basics:
End-to-end encryption: Require that all meetings are encrypted using AES
Chat: Allow meeting participants to send a message visible to all participants
Private chat: Allow meeting participants to send a private 1:1 message to another participant.
Auto saving chats: Automatically save all in-meeting chats so that hosts do not need to manually save the text of the chat after the meeting starts.
File transfer: Hosts and participants can send files through the in-meeting chat.
Display end-of-meeting experience feedback survey: Display a thumbs up/down survey at the end of each meeting. If participants respond with thumbs down, they can provide additional information about what went wrong.
Co-host: Allow the host to add co-hosts. Co-hosts have the same in-meeting controls as the host.
Polling: Add ‘Polls’ to the meeting controls. This allows the host to survey the attendees.
Annotation: Allow participants to use annotation tools to add information to shared screens
Whiteboard: Allow participants to share a whiteboard that includes annotation tools
Remote control: During screen sharing, the person who is sharing can allow others to control the shared content
Nonverbal feedback: Participants in a meeting can provide nonverbal feedback and express opinions by clicking on icons in the Participants panel.
Allow removed participants to rejoin: Allows previously removed meeting participants and webinar panelists to rejoin
In Meeting (Advanced)
Breakout room: Allow host to split meeting participants into separate, smaller rooms
Remote support: Allow meeting host to provide 1:1 remote support to another participant
Closed captioning: Allow host to type closed captions or assign a participant/third party device to add closed captions
Virtual background: Allow users to replace their background with any selected image. Choose or upload an image in the Zoom Desktop application settings.
Screen sharing: Allow host and participants to share their screen or content during meetings
Attention tracking: Lets the host see an indicator in the participant panel if a meeting/webinar attendee does not have Zoom in focus during screen sharing.
Waiting room: Attendees cannot join a meeting until a host admits them individually from the waiting room. If Waiting room is enabled, the option for attendees to join the meeting before the host arrives is automatically disabled.
Show a “Join from your browser” link: Allow participants to bypass the Zoom application download process, and join a meeting directly from their browser. This is a workaround for participants who are unable to download, install, or run applications. Note that the meeting experience from the browser is limited
Allow live streaming the meetings: Allow hosts to live stream their meetings to Workplace by Facebook or Custom Live Streaming Service
- Workplace by Facebook
- Custom Live Streaming Service
Zoom Webinar Settings
The screenshots below show the various settings made available through the zoom control panel. Depending on your settings your experience will be different.
General Settings:
Use Dual Monitors: Allows Zoom to take advantage of both monitors during a meeting. You will have one monitor that always displays the speaker or the gallery view and the other monitor will be used for screen sharing. *Cannot be used in conjunction with Side By Side Mode.
Enable Remote Control of all Applications: This setting will allow others with the remote assistance feature to control other applications on your device. This allows you to utilize Zoom instead of programs like TeamViewer or Anydesk.
Side by Side Mode: When you are using a single monitor, this feature is very helpful when turned on. The side by side mode will cause your screen to act like a split screen with the speakers on the right side and the screen share presented next to it on the left. You also have the ability to adjust the size of the split by dragging it right to left. *Cannot be used in conjunction with Dual Monitor Mode.
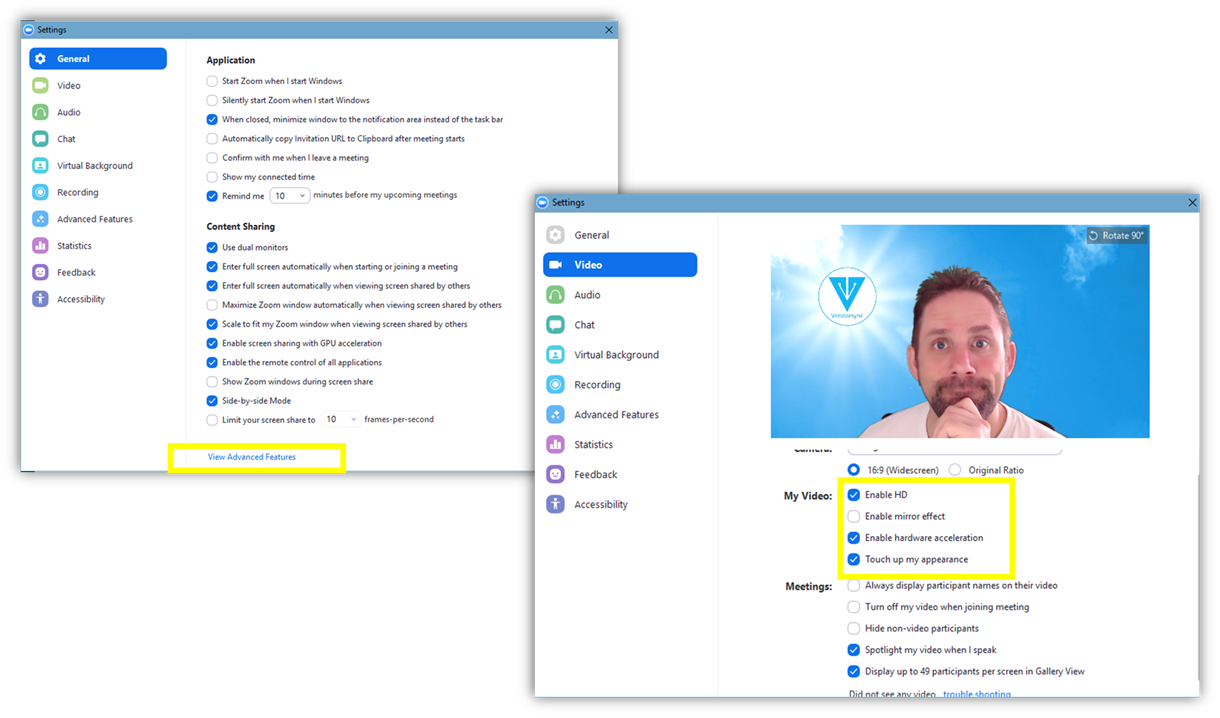
Video Settings:
Enable HD: This feature will take up more computer processing power but it will output a high quality video signal. This is very important when using Zoom to record tutorials to ensure your screen capture is easy to read.
Enable Mirror Effect: By enabling this feature, the video perspective will change from the appearance where your right actually appears on the left and the mirrored affect where your right appears on the the right side. A great example of how to use this would be recording a video demonstration of how to tie a tie.

Touch Up My Appearance: This should just be turned on by default! If it was not for this amazing feature I would probably look a lot different!
Audio Settings:
Automatically Adjust Volume: I have found that this setting generally causes the mic sensitivity to increase and decrease while recording a video. I strongly recommend turning this off.
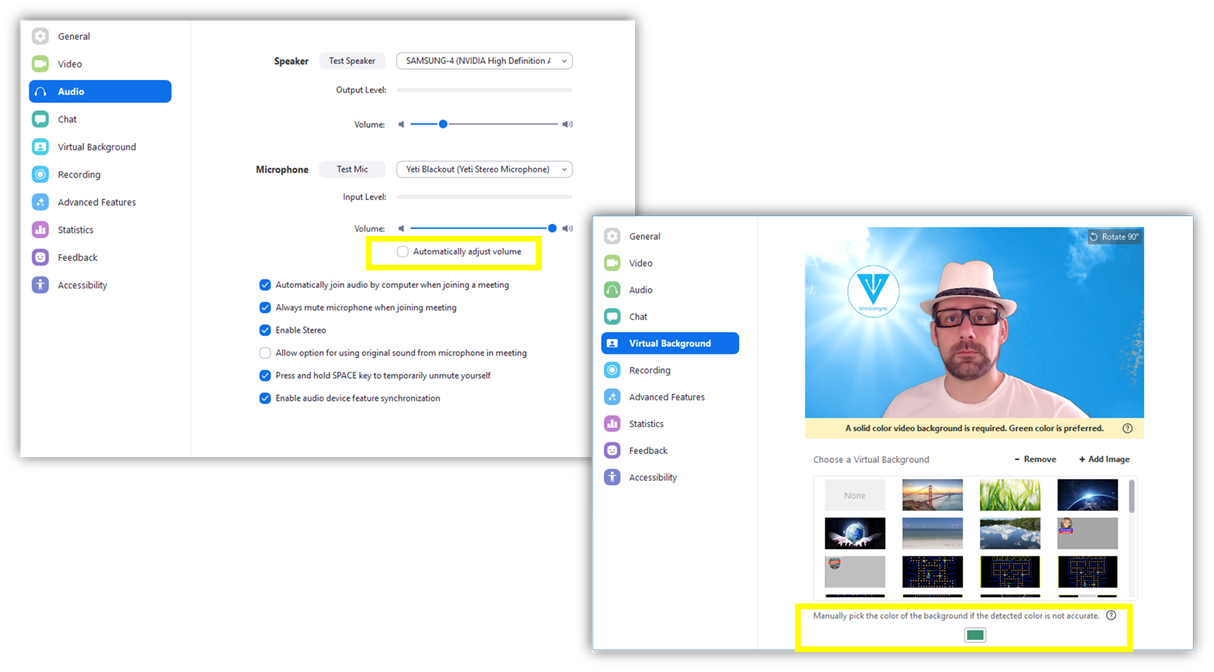
Video Background: This is easily one of my favorite features. Depending on the web camera you are using, it may be necessary to use a “green screen” or solid color sheet behind you to allow Zoom to replace the color with an image.
Web cameras like the Logitech C922 have built in technology to simplify this process without the need of a green screen.
XSplit also offers special pricing on another solutions that is supposed to eliminate the need for a green screen. XSplitVcam
Sharing a Zoom Webinar Live on Facebook
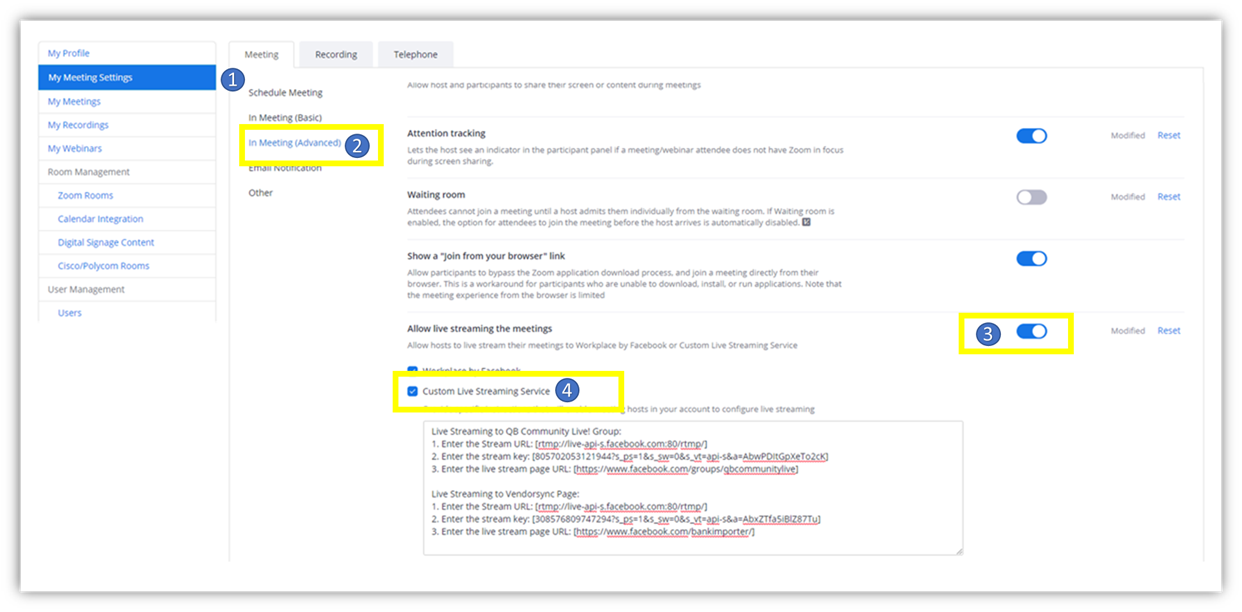
- Select My Meeting Settings
- Select In Meeting (Advanced)
- Toggle the Allow Live Streaming the meetings
- Check off the Custom Live Streaming Service box and copy the following information in as a template to be filled in
Live Streaming to [Enter place to live stream to]:
1. Enter the Stream URL: []
2. Enter the stream key: []
3. Enter the live stream page URL: []
If you will need to change the location of the live stream on a regular basis, you should skip the next step and manually add the location details each time. In the next step we will explain how to hard code a streaming value that can be used automatically within Zoom at any time.
Setting Up your default Live Stream key and location.
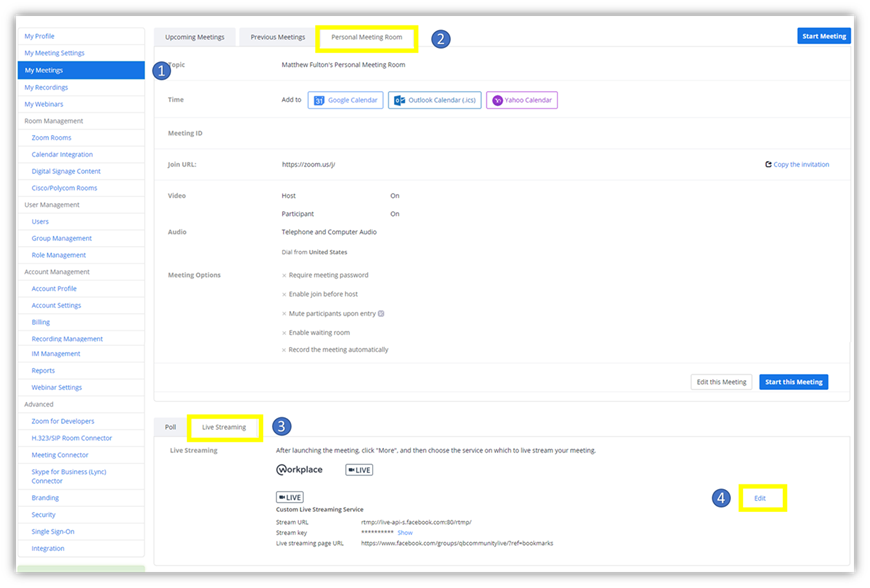
- Login into the Zoom website to access your account settings. Select the My Meetings tab from the left side.
- Select Personal Meeting Room tab from the top
- At the bottom of the page, select the Live Streaming tab next to Poll
- Select the Edit button to edit the Live Settings
Configuring the Custom Live Stream Settings:
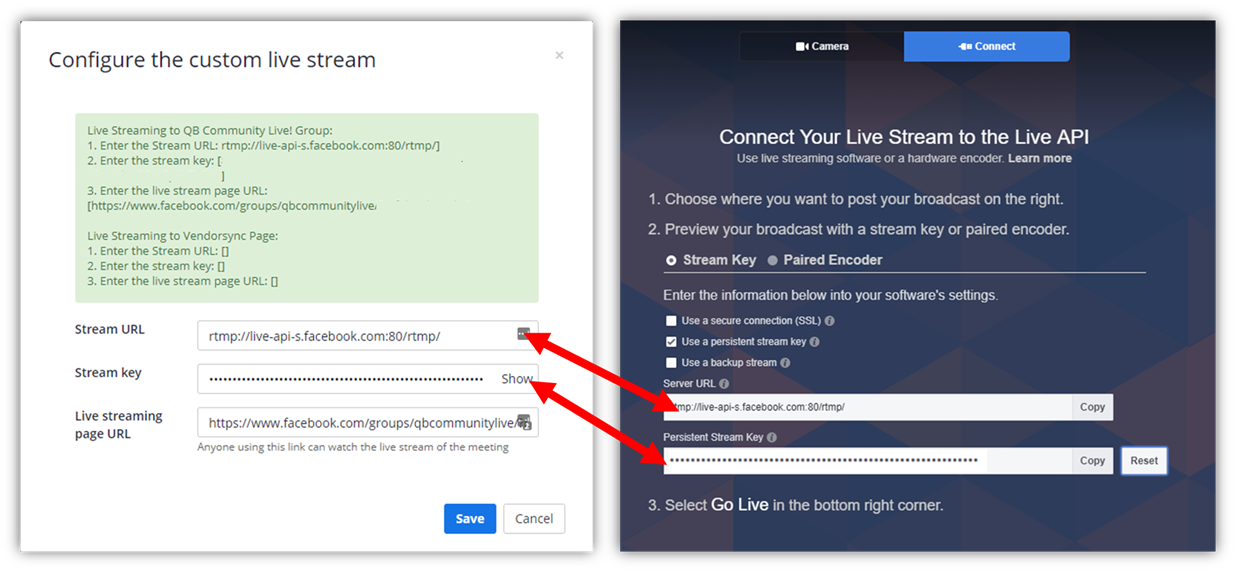
Facebook Live Settings
When setting up a Facebook Live you have two options:
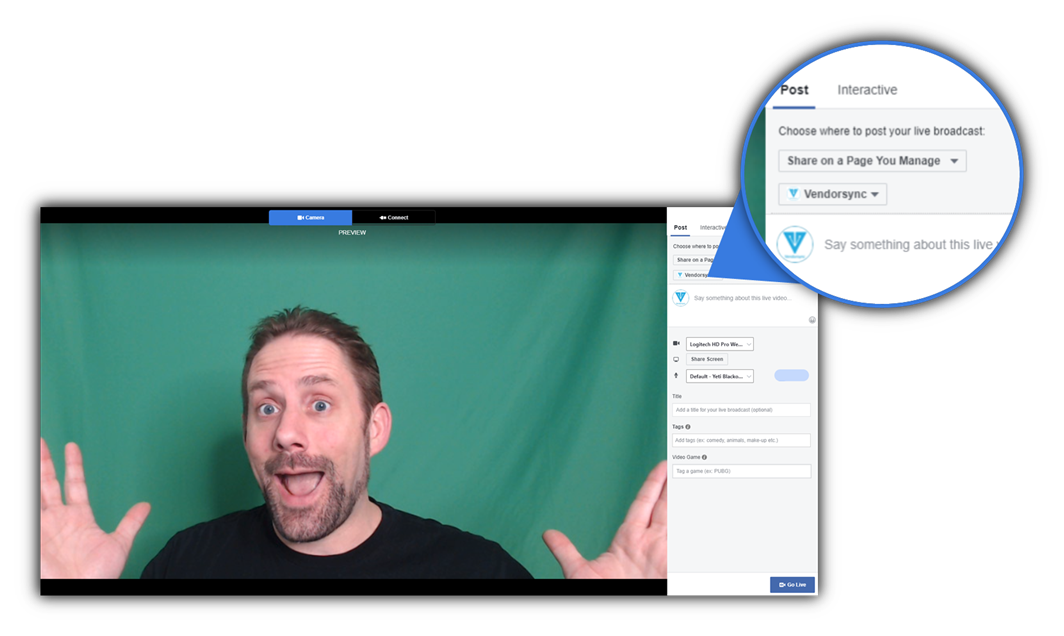
Camera: Go Live Immediately
Connect: Schedule a Future Facebook Live
Available Features During an Immediate Facebook Live
While streaming live to Facebook you will have the option where to stream to. You can choose between
- Your Personal Timeline
- A Facebook Page you Manage
- A Facebook Group you have permission to post in
- A Facebook Event you have permission to post in.
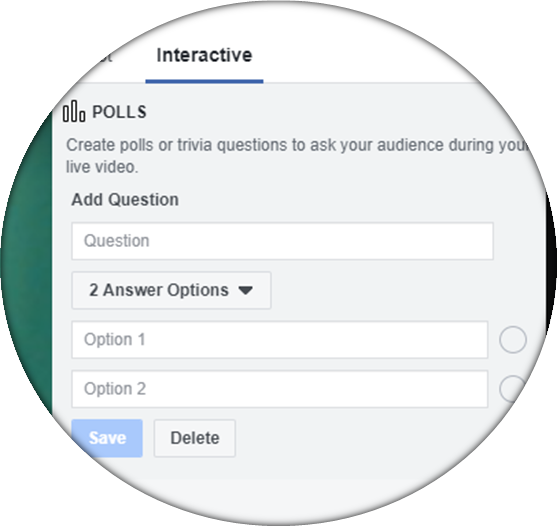
Interactive Polls
All Facebook lives have the ability to present live polls during the event. To accomplish this you will want to setup your polls before you start the live stream.
Each poll question can have up to Four Answers to select from.
If you wish to present the question as a quiz, you can also select on of the options as the correct answer. This is done by selecting the circle to the right of the option box.