

As business owners continue to transition toward a cloud based ecosystem, the need to differentiate your business from your competition will become more important than ever. To illustrate this point, I present you:
Parkway’s QuickBooks Online Invoice Impact Test
Requirements for the test:
- 2 people (minimum)
- 9 Bills
- 10 paperclips
- 10 pieces of papers as covers
- 1 invoice
Step 1: Collect 1 bill each from 9 different vendors,
Step 2: Cover up any company information including logo and addresses
Step 3: Lay them all out next to each other side by side
Step 4: Grab 1 customer Invoice and cover up your company information including logo and addresses
Step 5: Invite a second person to join and ask them to select only one document.
Repeat: as many times with different people for the best results.
Did they choose your QuickBooks Online Invoice or one of the bills?
While the above test may sound simple, it is exactly the type of activity entrepreneurial incubators, and think tanks use to give their growing startups an edge.
It can be easy to forget that to someone else; your invoice is no different than the 9 other bills placed in front of them. Fortunately, Intuit thinks that your QuickBooks Online Invoice should be just as unique as your business so they gave you the power customize your estimates, sales receipts and your invoices. Read along as we discuss the different customization and share our Parkway Tips to help you succeed.
GETTING STARTED
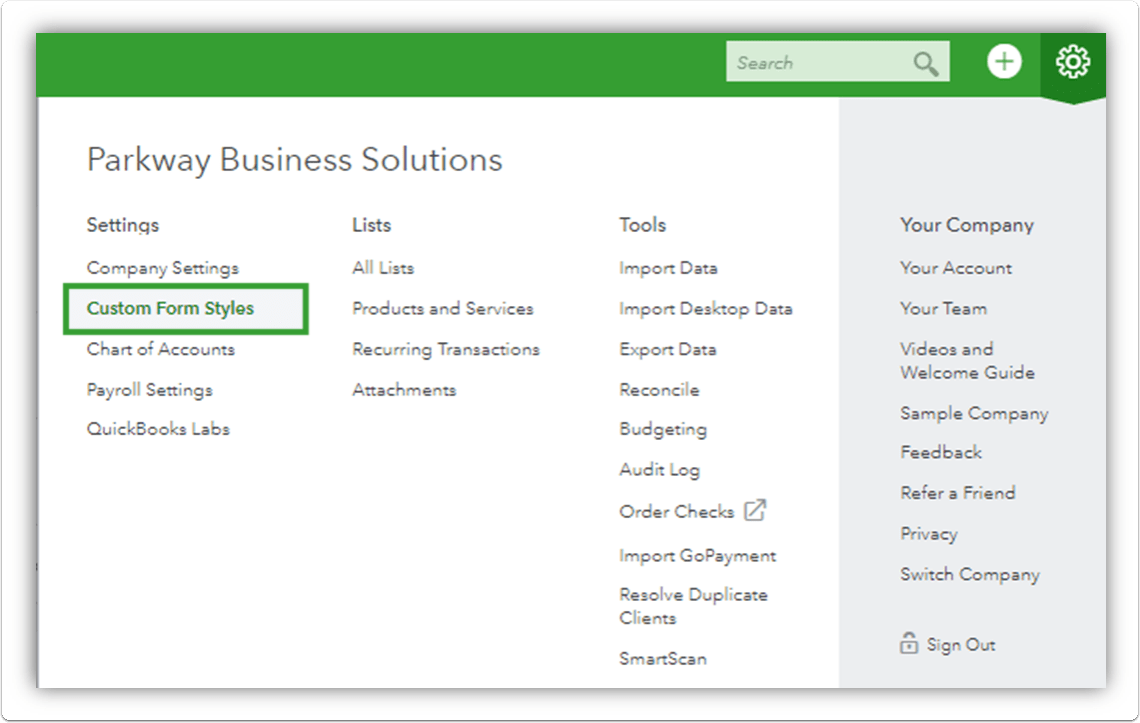
Click the Gear Icon in the Top Right of the screen
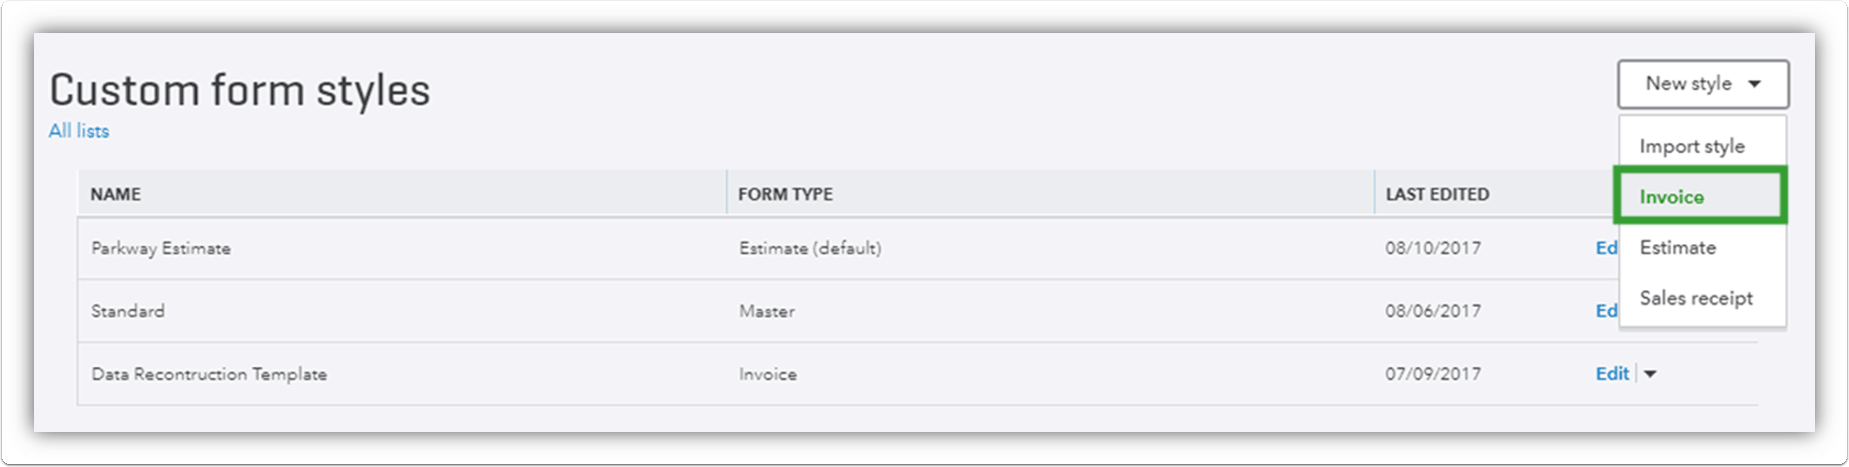
Select Custom Form Styles under the Settings column
Choose Between:
- Invoice
- Estimate
- Sales Receipt
QuickBooks Labs Tip: If you are looking to create a 100% custom invoice, it is possible to Import your own style by adding the feature. Visit QuickBooks Labs to find all features being beta tested.
DESIGN OPTIONS
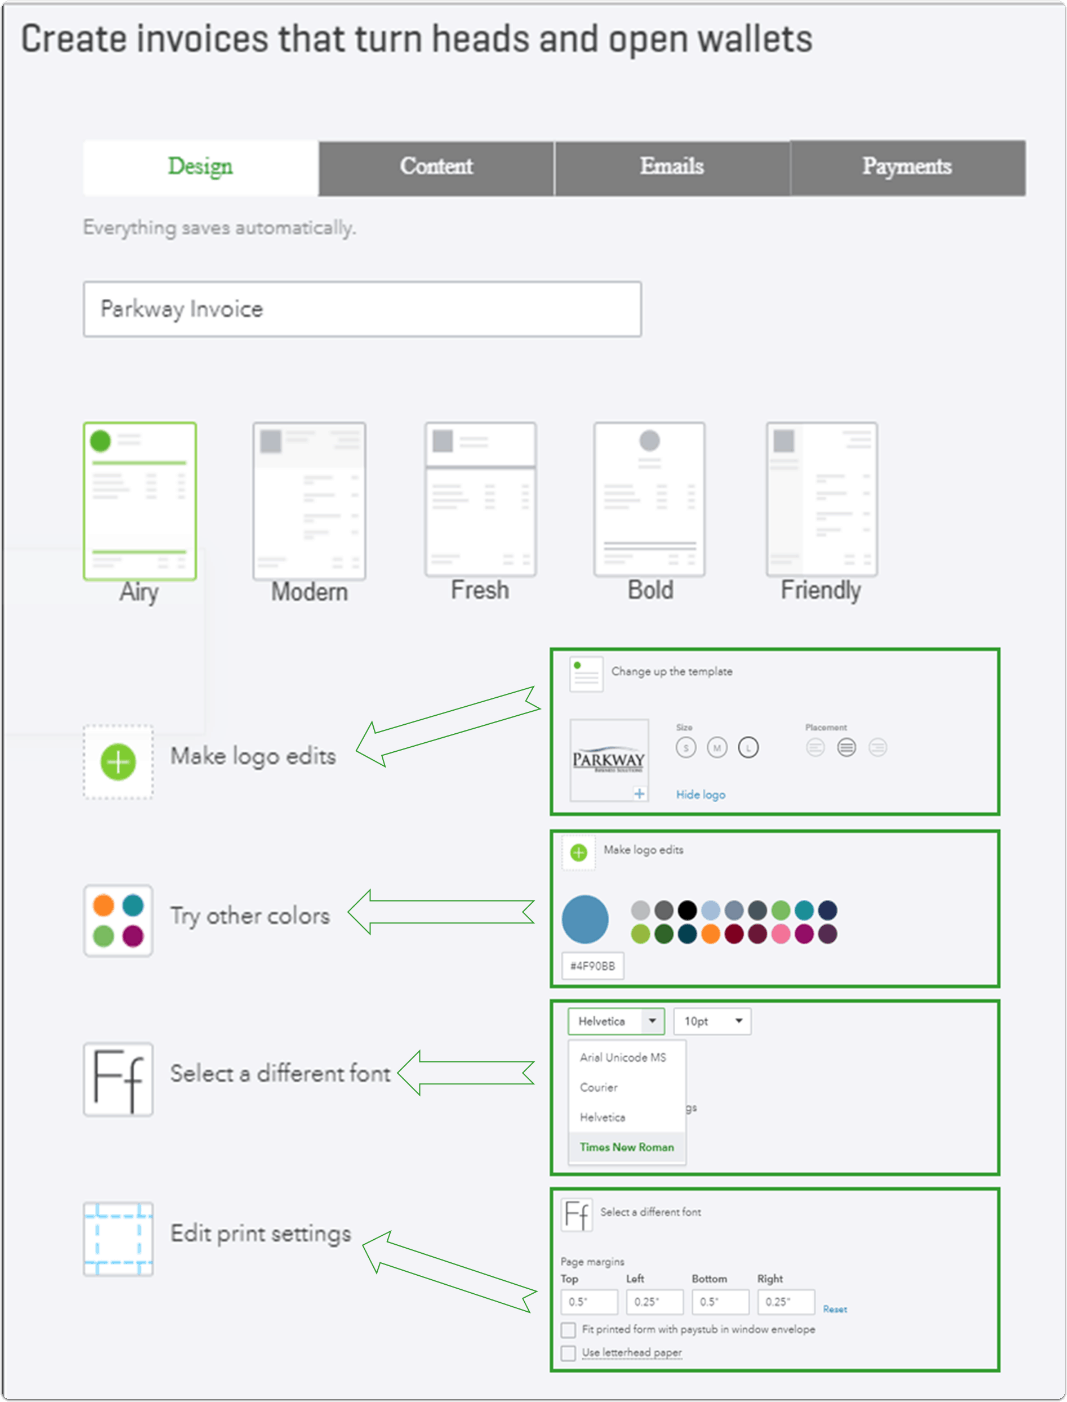
The design tab allows you to customize the overall look of the document including:
Logo: Size and location of the logo
Colors: Select the accent color of your document. You can select from a group of predefined colors or enter your own color code. As a colorblind accountant, I use the instant eyedropper app (http://instant-eyedropper.com/)to select the coloring from our clients’ logo to ensure I get the correct color.
Font: Select which font to use on the document as well as the size.
Print Settings: Edit the page margins to match your specific needs. For example, if you are using custom letterhead with a border, you can move the outer margins to match your printing needs.
Parkway QuickBooks Online Invoice Tip:
You will want to create and save a special version for printing if you also plan to send them digitally. Check both versions to make sure they look exactly how you want. When sending digitally, your QuickBooks Online Invoice will always use the invoice template that has been labeled as the master template. Even if you select a unique format under the more tab before printing, the invoice displayed will remain the default selection.
CONTENT TAB: ADJUSTING THE HEADER

1: Company Information:
- Business Name:
- Phone Number
- Email:
- Address:
- Website:
Select if you wish to show the following information in the header of your Invoice. These fields will be auto populated with your company information however you can manually edit the details to display as you wish. These fields are in a predefined order but you can change the order by manually typing what you want to display.
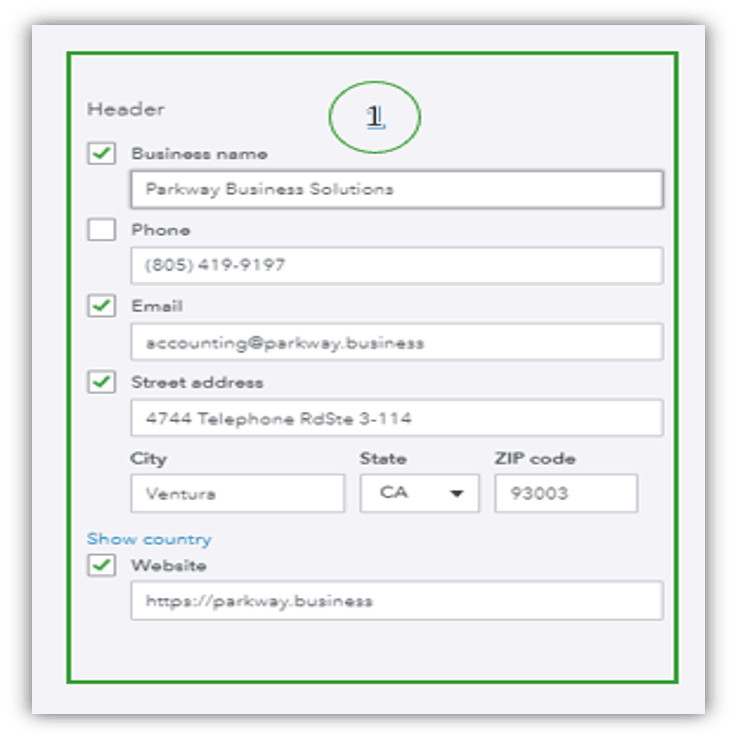
Parkway QuickBooks Online Invoice Tip:
We find that the header looks better without the company information displayed at the top with the Logo. Since most business logos include the business name but not the address, we find it hard to make the logo options to line up correctly with company info. Instead, deselect all of the company information boxes and add it to the footer of the invoice instead.
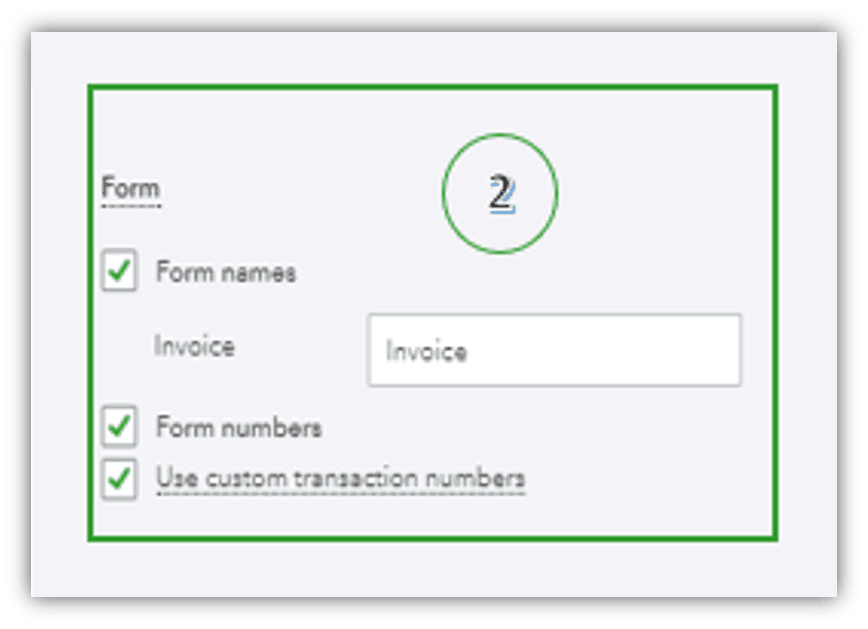
2: Form Details
Form Name: Use this to change the name of your document to your needs. For Example, you could change the name to Deposit or Retainer and only use that custom format when sending the related document to a client.
Custom Transaction Numbers: This powerful field will allow you to create your own invoice numbering. For example you can change your numbering to display INV-1123 but this also opens the ability to change the invoice number on the fly and may result in duplicate invoice numbers when the person invoicing changes the invoice number. If the check box is cleared, QuickBooks will auto number the documents for you.
3: Display Options
Select the options that you would like to be displayed on your document. If you added custom fields as part of your company setup, those fields will be auto filled. You can modify those setting by changing them here but you are still limited to a maximum of 3 custom fields.
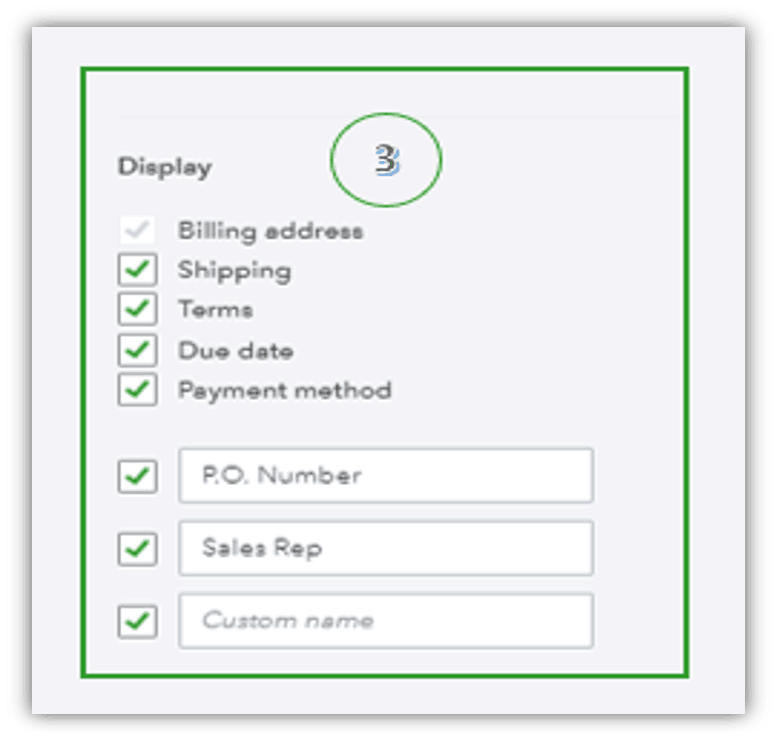
Parkway Tip:
Using Terms to Track Sales By Person: If your company does not provide terms on your invoice, you can use the Terms drop down to track sales commissions instead. The terms field can act as a unique drop down field that can be used for filtering in reporting. This eliminates the challenge caused by variances in the custom fields such as Matt, matt, Matthew, and matthew. With a drop down, the user has a predefined group of options. When you deselect the terms box, this field will not be displayed on the invoice but remains an option for internal use.
CONTENT TAB: ADJUSTING THE COLUMNS
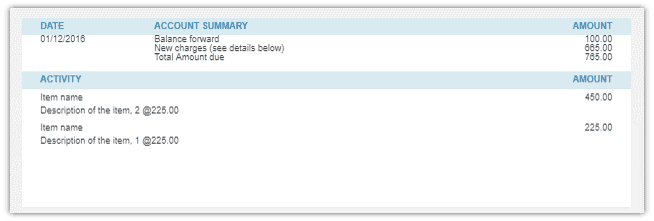
1: Account Summary:
Select this option if you want a customer summary of outstanding balances to be displayed at the top of the invoice. Companies that utilize accounts receivables will find this useful especially when send invoices out to their consumers.
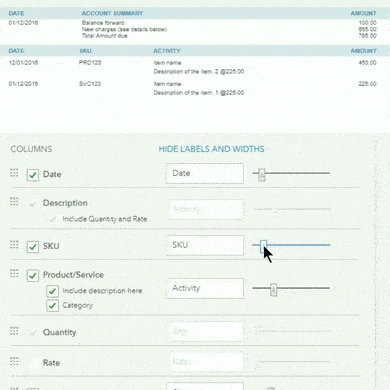
2: Columns:
The Body of the QuickBooks Online Invoice is by far the most intricate portion of invoice template creation due to all the customization opportunities. Not only can you choose what columns you do or do not want displayed but Intuit also made it simple to change the column names, spacing and order of display. Here is a breakdown of the different options:
- Date: Service based businesses will appreciate the ability to add the date services were performed.
- SKU: E-Commerce & Retail Business with inventory can use the SKU to differentiate between products
- Product/Service: This field is pretty powerful and offers the ability to display both the category and the description all in one field by displaying in a stacked line display. We find this to be very useful for companies that use the description field
- Description: For most companies, the description field will take up the most real estate on the invoice. To expand the area available, it is possible to have the description field also include the quantity and rate. If you use very large descriptions it is also possible to stack multiple lines to improve the look.
- Quantity: An optional field to display, some service based businesses such as doctors may choose to eliminate this to only display the total line item amount
- Rate: Also an optional field to display. If your quantity sold is always 1 then displaying the line amount would accomplish the same goal.
- Amount: Amount is fairly self-explanatory; however, you may be able to use our Parkway Tip below regarding the Amount field just in time for the holidays.

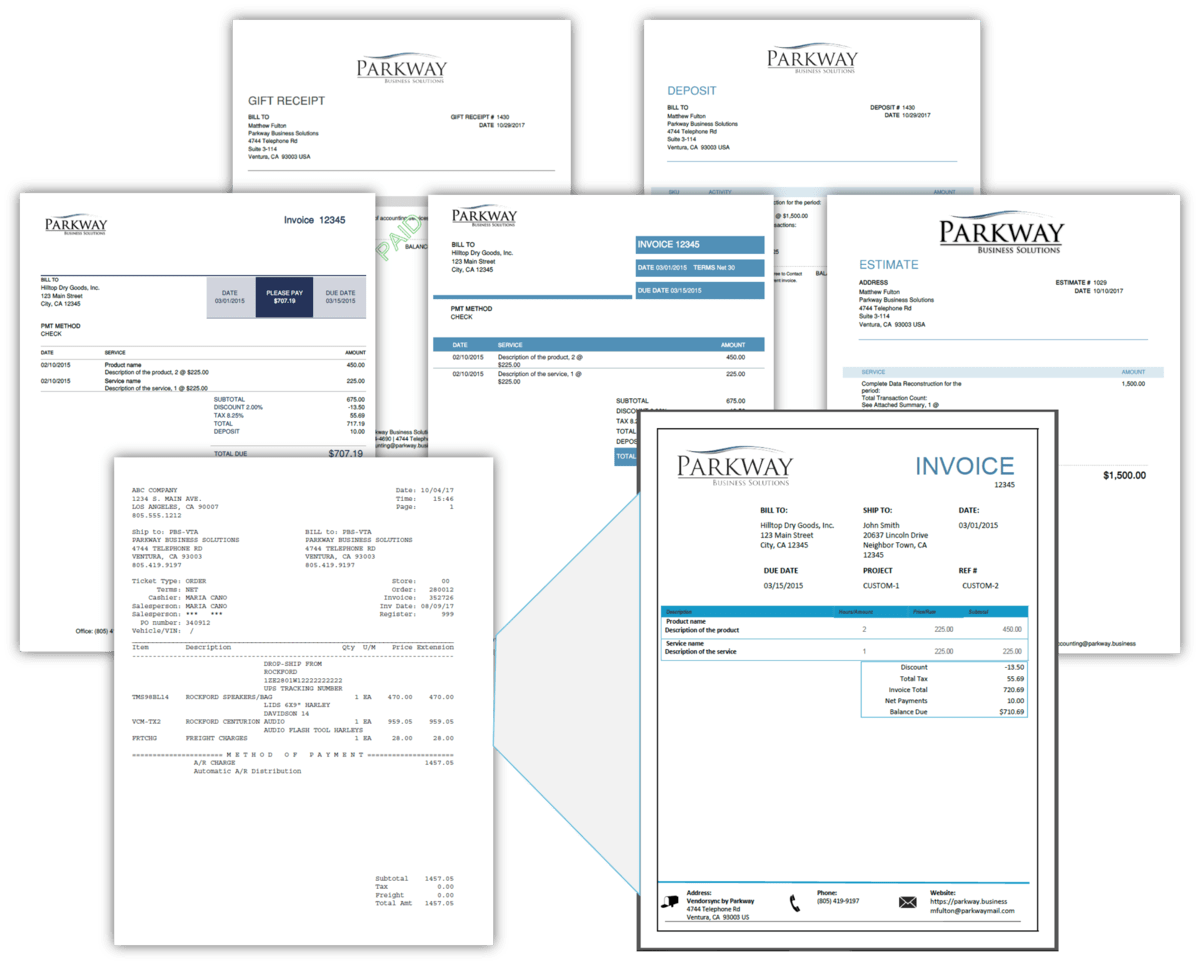
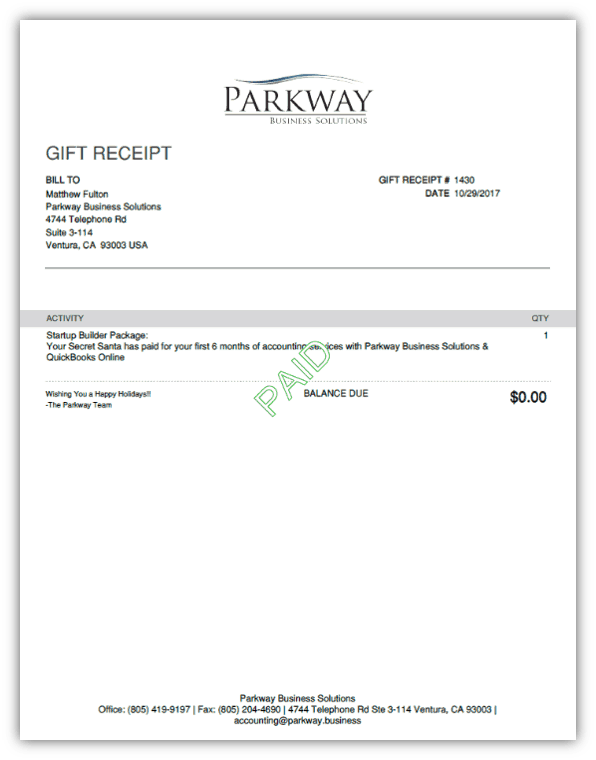
Parkway Tip: Creating a Gift Receipt
This holiday season, increase your sales by offering Gift Receipts. To achieve this look, use the following settings:
- Create a new invoice with the Airy template, and center your logo.
- From the content tab, change the form name from Invoice to Gift Receipt
- Remove all company information from the header and add it into the footer instead
- Remove the all fields except the description column
- From the footer section remove the discount and deposit columns
- In our example, we created a bundle item which allows us to hide all of the line items from the purchases.
The end result is a print ready return receipt without the individual breakdown.
3: Activity Options:
(These features are hidden behind a show more activity link) The hide activity options section focuses on billable time and expenses. Businesses that utilize a large number of line items can choose to
- Group similar items by
- Day
- Week
- Month
- Type
- Subtotal the groups
- Collapse the activity rows down to a single line item
- Display the markup on billable expenses
- Display billable time including the hours rate and the employee name.
CONTENT TAB: ADJUSTING NAMES AND WIDTHS
4: Show/Hide labels and Widths:
The Sliders make it possible to adjust the overall width of each field but be aware that changing one of the sliders will cause others to increase and decrease also. The total area must always be equal to 100% so if you increase the area needed for amount, then the columns to the left will need to move further left to provide more space. This same concept will happen for all columns and can take some time to setup before you get it to be just right. The video will show how the different adjustments will affect the look of the invoice.
IMPORTANT: Be sure to save your settings and then exit and print preview an actual copy of the document type you are creating. Choose an existing document with a couple line items that uses a longer description to see how it appears when you go to print or preview. Be sure to check the spacing on your quantity and rate and amount, if the space is to small you may end up with digits on the line below.
CONTENT TAB: ADJUSTING THE FOOTER
1: Message to Customer
Add a customer message that will be added to every document of the same type. If you are creating an invoice template, this will modify the message on all invoice templates. You can manually change the message per invoice as desired.
2: Display Options
Determines if your document will display Discount or Deposit field on your document.
3: Footer Text
Add custom text to the bottom of your document including the font size and the format.
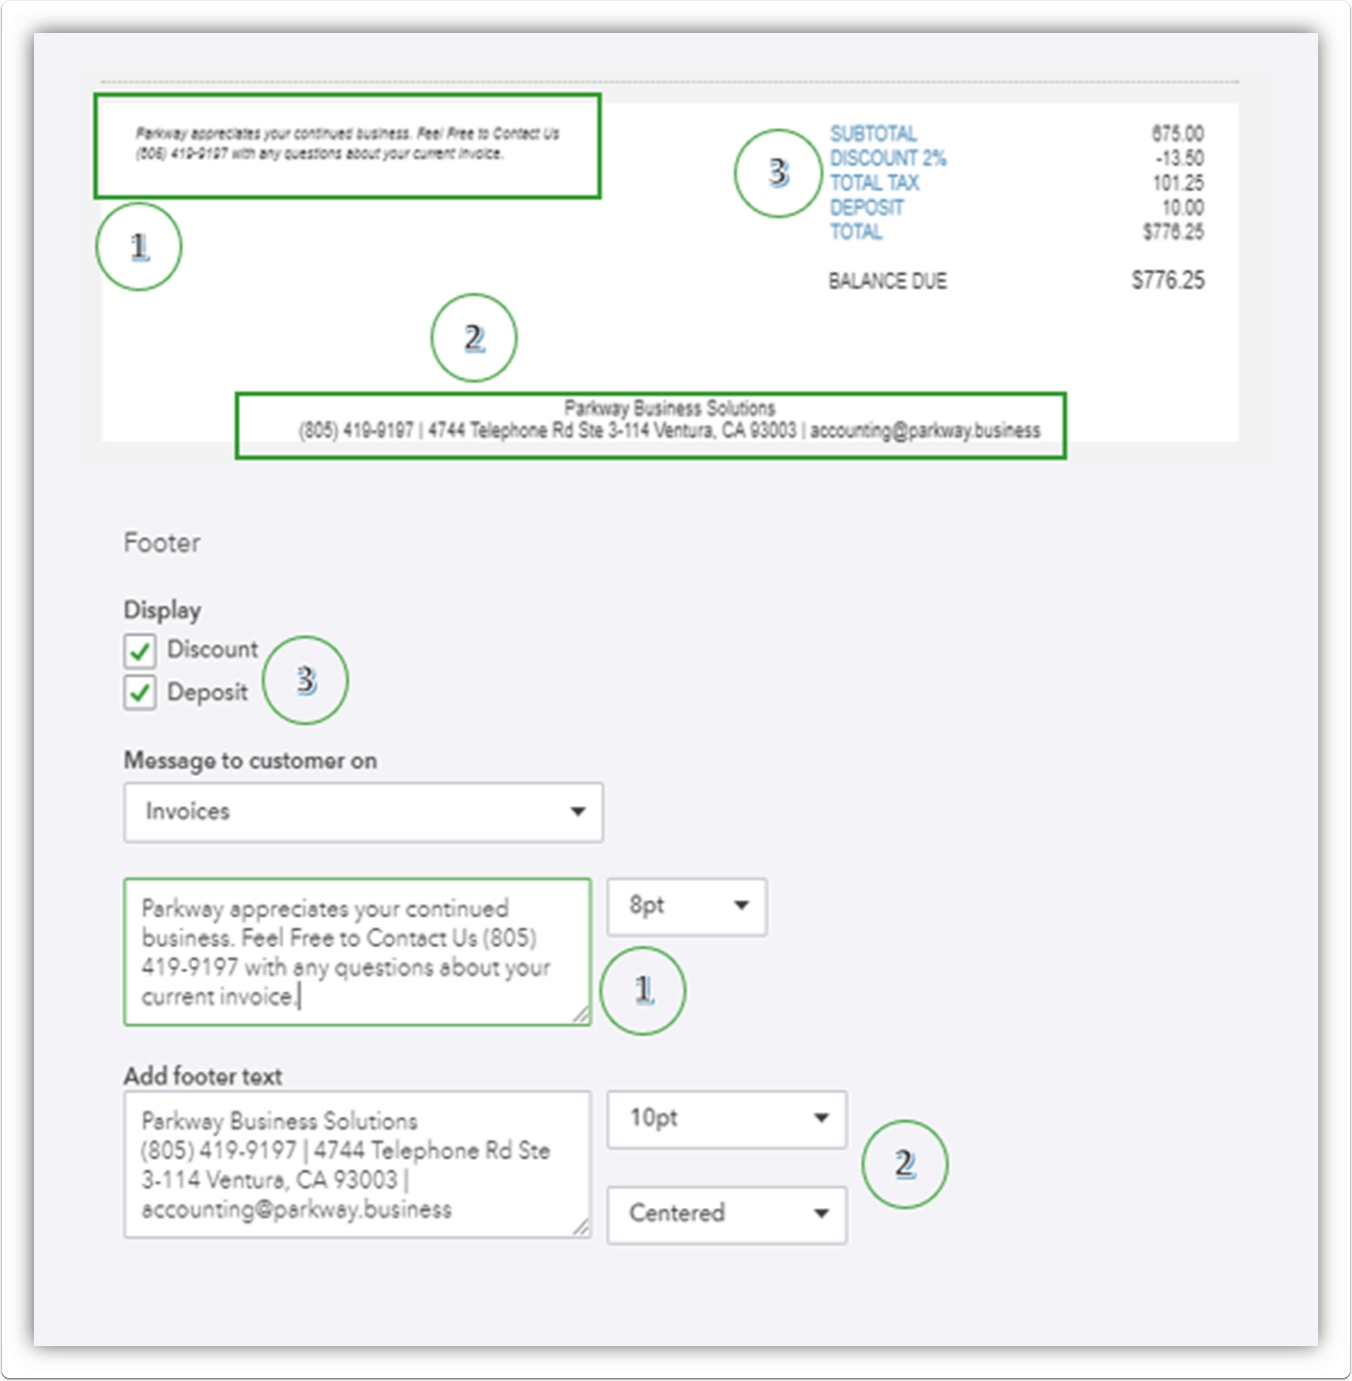
Parkway QuickBooks Online Invoice Tip:
Use this area to add your company contact information to create a cleaner look at the top of the document. Set the text font to center and choose the correct size for the amount of information being displayed. We like to have the company name on the top line and then we put the most important contact information on both outside ends.
Business Name
Business Phone Number | Business Address | Website | Email Address
CREATED USING QUICKBOOKS ONLINE
UPLOADED INTO QUICKBOOKS ONLINE

Today’s business environment is heavily driven by emails and electronic communications. As more people continue to convert to online invoicing, business owners need to take the time to customize their most important document, their invoice. Like most forms of marketing, less is best. Be sure to only add the information that a customer needs on the invoice and hide the rest. Make sure the Amount Due and the Due Date are easy to find.
If you are not already using Intuit Merchant Processing, signup right away! Intuits merchant processing rates are very comparable to Stripe, Square but provide you the ability to charge and collect payment without ever leaving QuickBooks Online. You clients will appreciate how easy it is to make a payment, leaving you with less statement reconciliations each month.
Now it’s your turn to tell us your thoughts. Whether you agree, disagree, or have suggestions for improvement, please share your thoughts below. As always, Parkway wishes you all a very successful week.