QuickBooks Online Bank Feed Rules Part 1

Cloud Accounting has changed the way businesses track their finances forever. While Xero helped to revolutionize the modern-day bank feed, Intuit raised the bar with their QuickBooks Online Bank Feed and Banking Rules. When utilized correctly, Bank Feed Rules can handle a large portion of the transaction review process by auto assigning what a transaction was for including who paid or was paid. But as the saying goes, with great power comes great responsibility, that’s why we created a guide to explain how to use QuickBooks Online Bank Feed Rules.

QuickBooks Online Bank Feed Rule Creation
Part 1

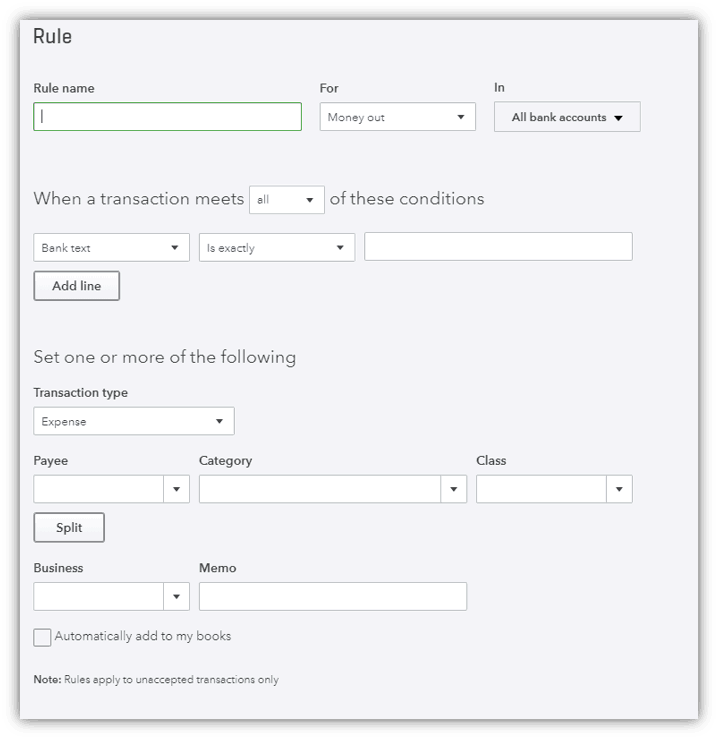
The Sum of the Parts That Make a Rule

  1. Rule name – Give each rule a name.
  2. For – Select whether the rule applies to Money in (deposits) or Money out (withdrawals).
  3. In – From the drop down, you can select which bank accounts this rule applies to. The default is All bank accounts.
  4. Conditions – You have the option to set the conditions that the transaction must meet for this rule to apply:
    • From the drop down, select all or any
    • From the drop down, you can select bank textdescription or amount.
    • From the drop down, you can select containsis exactly, or doesn’t contain.
    • In this field, you can enter the bank textdescription or amount.
  5. Transaction type – Select whether the transaction is an expense, transfer, check, or deposit / credit card credit
  6. Payee – Select the payee (if applicable).
  7. Category – Select the account the transaction should be categorized to.
Bank Feed Rules

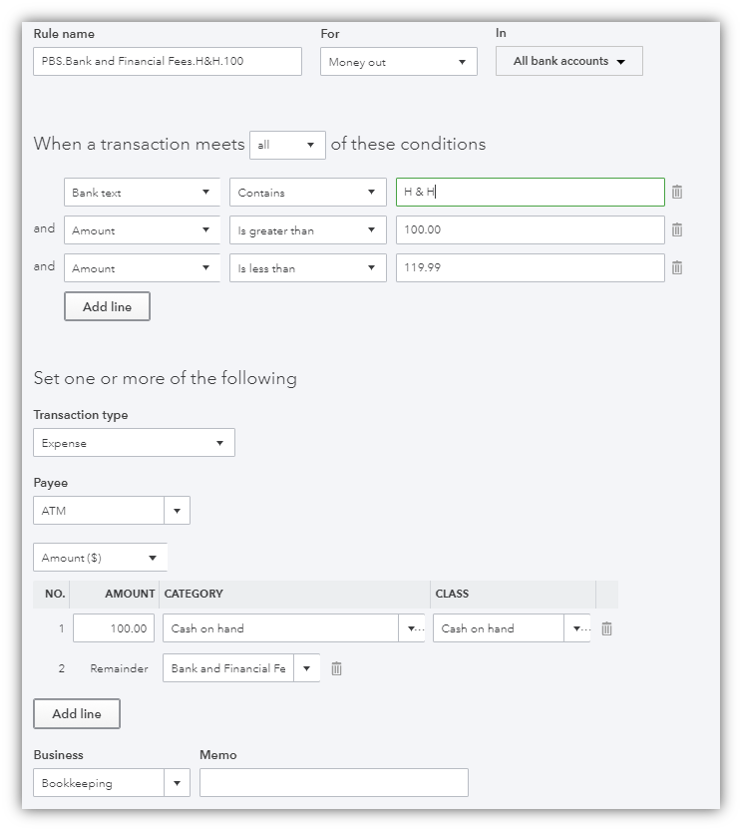
Naming your QuickBooks Online Bank Feed Rules for Fast Searching

 Searching Rules by Name:If you have a lot of rules and are not certain if you already made a rule that could be causing an issue, try using the browser search function to quickly find the rule or the account. Take a look at the picture and you will see how the Google Chrome search function (Ctrl + F) was able to pull the word postage from the different sections of the rule. Usually we add the vendor as part of our name structure.
Rule Name:Create a unique name for each bank rule. We utilize the format:

PBS.Category.Vendor = PBS.Auto Fuel.Chevron

This allows us to quickly find the rule by using the search function of the web-browser.

FOR what & IN which

This is one of the easiest areas to overlook and often one of the biggest reasons a rule fails.

For:Select if your rule will be for money in or money out transactions, if this is set incorrectly, your rule will not work correctly.

Selecting what accounts to effect:

In:Select the accounts you want to be affected by the rule. This will allow you to create rules that will only affect one account or all accounts.

There are some other unique details with rules that make sense but often are overlooked, for example, if you set the transaction type to be a Check, then it will remove all credit cards accounts and only select checking and savings accounts.

Download

Parkway Bank Rules Tip

Download a set of our Universal Bank Rules

Download

Establishing the QuickBooks Online Bank Feed Rule Conditions

When a transaction meets All or Any of these conditions:

This is the most common reason a rule will not work, especially if you try to add multiple conditions. If you have a rule that just does not seem to capture the way you would like it to, check this first.

All: The All setting is best used when trying to dingle out specific transaction types with unique values.  A great example of this would be creating rules for ATM withdrawals. In the example below you can see how using the all function enables you to set the defined range for the dollar amount.  Later in the tutorial you will see how we use the Split function to auto assign the bank fee value too.

 Any:  Any works great when you have a vendor that uses multiple variations and you want to use one rule to capture each of the variations. For Example, you could combine all gas vendors under a single payee name such as Fuel Purchases.  The bank memo would still distinguish between the different stations in case it was necessary to break them out.

We take advantage of this when we import our check data from Ledgersync. With Ledgersync we area able to add payee names to all of the check images and then when we code the check description, all imported checks are captured by the rules.

Sample Bank Rule for Chase Banking Customer ATM WIthdrawal

To Payee or not to Payee

Payee:The payee section of QuickBooks Online is a very interesting field for both Vendor Names and Customer Names. Depending on how well you setup your Vendors in QuickBooks Online, it is possible to create bank rules without a Payee name and still have the Payee details populated.

  1. Add a single rule for a single vendor ( 1:1 relationship)
  2. Add a generic name for multiple rules (1:5 relationship)
  3. Leave the vendor name blank but add a rule trigger such as “_Fuel to the memo fields of the transactions. If your bank import file has Payee Names assigned per transaction, then they Payee will be auto generated. This is a great way to use Ledgersync’s check images with QuickBooks Online. (1:many relationship)

Behind the scenes of QuickBooks Online, there are many different variations of names that play important roles on how transactions match but the most important one is the Display Name.  The Display Name is . It is the one type of name that can never be duplicated (even across vendors and customer) and is also what everything matches against.

QuickBooks Online Bank Feed Options to Set a Payee

Class and Location Optional But Great!

One of the greatest improvements to the QuickBooks Online Bank Feed rules compared to the desktop renaming rules, is the ability to assign transactions at the class or division level. By combining the split function with the class level, it is simple to split out common expenses across different divisions automatically.

QuickBooks Online Bank Feed Locations

The Power to Split

Rules for Transaction splits can be very trick but also very rewarding. One of my favorite examples of using the QuickBooks Online Bank Feed split function in rules is creating a rule for ATM withdrawals.  By utilizing the split function, you can auto categorize what cash was withdrawn as well as the service charge that was paid.

Continue to Part 2

QuickBooks Online Bank Feed Rules
Part 2

Want to learn more about QuickBooks Online Bank Feed Rules? Check out our 2nd installment in the Bank Feed Series

Continue to Part 2

Checkout our Process Street Checklist for Bank Feed Rules

Print a copy of the checklist

[fusion_widget_area name=”avada-custom-sidebar-bankrules” title_size=”” title_color=”” background_color=”” padding_top=”0px” padding_right=”30px” padding_bottom=”60px” padding_left=”30px” hide_on_mobile=”small-visibility,medium-visibility,large-visibility” class=”” id=”” /]

Are you a QuickBooks Desktop User?

Bring the Power of Cloud Accounting to QuickBooks Desktop

VENDORSYNC

QUICKBOOKS DESKTOP AUTOMATION

QuickBooks Desktop Tutorials & Guides

QuickBooks Desktop Renaming Rules

QuickBooks Online

Bank Rules

Ledgersync

Guides

Join to newsletter.

Subscribe to be notified of new content.

Do you have a question we can help you with?

Call us today at (805) 419-9197

We look forward to connecting soon.